Shopify Integration Steps
Install the PayPlan by RBC App (Checkout)
Installing the PayPlan app allows customers to select PayPlan as a payment method on the Shopify checkout page. When customers select PayPlan at checkout, they are redirected to the pre-qualification and checkout experience before ultimately returning to your standard purchase confirmation page.
Step 1: Locate your api key, api secret, and integration keys
In order to Configure the PayPlan app you will need Access Keys. These keys are available in your Merchant Portal. Sandbox versions of these keys will be needed when running test transactions, and you should work with these keys first. Access to the portal will be setup by the Integration Manager supporting you.
PayPlan Live Credentials: https://merchants.rbc.breadpayments.com/
PayPlan Sandbox Credentials: https://merchants-preview.rbc.breadpayments.com/
Once logged in, first click on "Account Settings". Then click on the Account Settings drop down and select "Access Keys" to view your credentials. Keep this page open as you will need to reference these keys shortly.
Step 2: Install the PayPlan by RBC App
Navigate to the PayPlan App here: https://apps.shopify.com/rbc-payplan-app
Click “Add app”
Then click “Install app”
Click “Activate PayPlan”
Click "Manage"
Step 3: Configure the PayPlan App
Here you will verify your desired settings and enter the keys you located in Step 1.
If your Success manager has approved your account to “auto-settle” transactions, enable Auto-Settle payments.
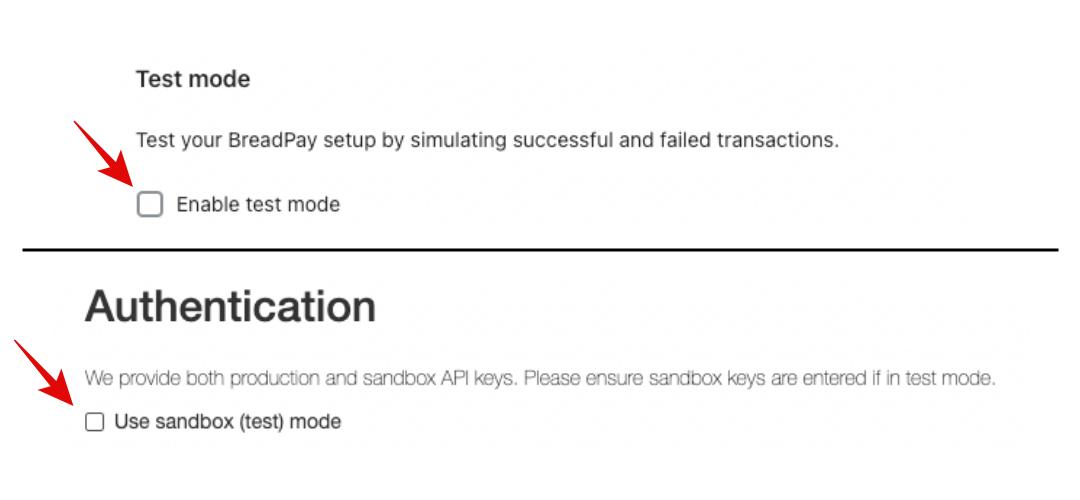
Check the Box "Use sandbox (test) mode", when running test transactions.
Enter the Sandbox API, API Secret, and Integration keys from the Sandbox Portal.
When settings are configured, Click "Save" in the top right corner.
Confirm That PayPlan Is now A Payment Method at Checkout
The PayPlan app is installed and configured. PayPlan should now appear as a payment option at Checkout. You can confirm this by running through a standard checkout in your Shopify store and looking for PayPlan at the payment step.
PayPlan is now in test mode as a payment option on this site — if you are not ready to test Checkouts, click the Deactivate option in the Payment Settings. When ready to re-activate, you can manually search for PayPlan under Additional Payment Methods > Add payment methods.
Note: If you activated PayPlan as a payment method on your live site, customers will be able to see and select PayPlan as a payment method on your live store. We recommend activating and testing during low-traffic hours as Shopify does not offer a preview mode for alternative payment gateways.
Note: Currently, the PayPlan option displayed in the payment method step cannot be customized due to Shopify’s constraints
Install the PayPlan by RBC Messaging App (Required)
The Messaging App is required for full functionality and integration with PayPlan. This app allows important order details to be captured and configured. It also allows you to place PayPlan pre-qualification buttons throughout your site, increasing awareness of your financing option and ultimately driving conversions. By placing buttons strategically on your product, cart, and dedicating financing pages, customers are able to pre-qualify and complete a checkout with financing. To add a pre-qualification button to PDP and Cart pages, you will need to:
Step 4: Install the New PayPlan Messaging App
Navigate to the PayPlan Messaging App here: https://apps.shopify.com/rbcpayplan-messaging
Click “Add app”
Then click “Install app”
Now take a moment to configure the Messaging app to your needs. It is highly recommend to enable Web-hooks.
Copy the Shop ID at the top of PayPlan Messaging App, you will need it in the next step.
Click "Save", in the top right corner.
Step 5: Adding PayPlan Buttons to your site.
If you are using a Shopify 2.0 Theme the PayPlan buttons can be added via Theme Blocks in the Themes customization options.
If you are using a Legacy Shopify Theme or if it is your preference, you can add the buttons directly into your liquid files. Those instructions can be found here.
Using Shopify Theme Blocks:
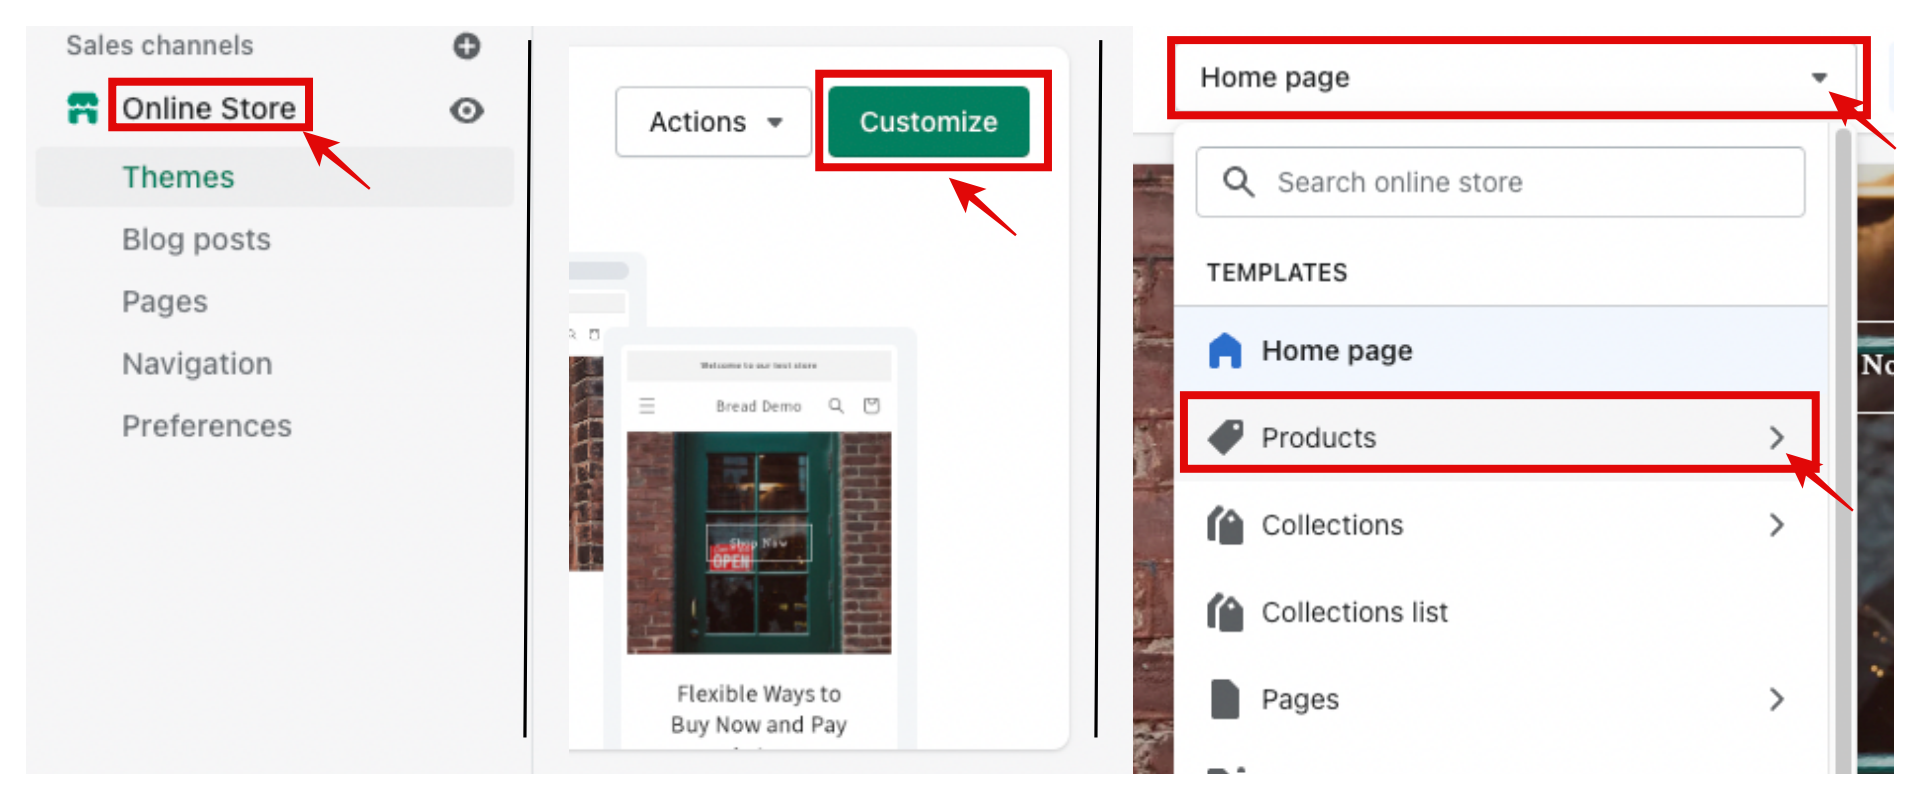
From your Admin home page, click "Online Store" in the left navigation menu, and then click "Customize" on the right. Across the top of the Customize page, use the top centered drop-down menu to select your "Products" page, you can start with your default product page.

In the Product Information menu select "Add block", scroll to the apps section and select "PayPlan As Low As Button". Once added, click on the button in the menu.
After clicking on the PayPlan element, paste the Shop ID that you copied from the Messaging app in the previous step. Then Click Save in the top right corner.
The button should now appear on the page. In the Menu, use the app squares on the right to drag and drop the button to its desired location.
The steps for adding a theme block should be repeated for any other product page templates and for your cart page.
Note: Every Shopify theme handles browser width and device (desktop vs mobile) size differently. Open one of your product pages in a desktop browser and shrink/expand the browser horizontally. Similarly, try opening a product page on a mobile phone. Pay attention to how your “Add to Cart” buttons adapt to different widths and devices and make sure your PayPlan button responds similarly.
Shopify Theme Blocks
For additional details on working with Shopify Theme Blocks, please reference the Shopify Documentation here: https://www.shopify.com/partners/blog/theme-blocks
Testing Your Integration
We recommend you test your PayPlan integration with your sandbox keys and use a sandbox environment if you have one.
Ensure that you have entered the Sandbox Keys, that were gathered in step 1, and have checked the box labeled "Use sandbox (test) mode".
In your store admin page, navigate to settings > payments and find PayPlan under “supported payment methods”, click "Manage".
Select the box labeled "Enable test mode", then click "Save".
You can leverage the following dummy data to run test transaction while in test mode:
- Any name, address and email
- Mobile Number: A random sequence of 10 digits – don’t use duplicates or sequential numbers (e.g. 555-555-5555 or 123-456-7890)
- Birth Date: A birth date before 2000
- Last 4 Digits of SSN: 07xx (Any 4-digit number starting with 07, such as 0789) to simulate approval, or 0400 to simulate denial
- Mobile Code / Token: 1234
Note: You will not receive emails nor text messages when testing in sandbox mode. Please refer our Testing documentation for additional guidelines.
Going Live with PayPlan by RBC
Once you are ready to go live with your PayPlan integration, you will have to enter your Live Production API and Integration keys in the PayPlan App payments settings. Please reach out to your main point of contact and they will provide you with access to the Production Merchant portal where you will find your live keys, as described in step 1.
Shopify Payment Settings
In your store admin page, navigate to settings > payments and find PayPlan under “supported payment methods”.
Click “manage”
Uncheck the "Enable test mode" option, then click save.
Click "manage" again
Uncheck the "Use sandbox (test) mode"
Verify your Live keys have been entered correctly,
Click save in the top right.

Congratulations, you are now able to accept live PayPlan orders!
Please check your site to ensure placements are rendering at PDP and Cart pages, and PayPlan is functioning correctly as a payment option at checkout.
Merchants Operating in Multiple Regions
Note: For merchants operating in multiple regions, please be sure that automatic domain redirection is configured as described here.
Additional Shopify Guidance
Shopify provides additional support documentation here: https://help.shopify.com/en/manual/apps/working-with-apps
Updated over 2 years ago
