Magento 2 Integration Steps
STEP 1: Install and Configure Payplan Extension
You can install the PayPlan Extension by following the below instructions
Zip File Installation Steps
In order to install the PayPlan extension using a zip file:
- Download the PayPlan extension as a zip file from here. Make sure you download the most recent version
- Unzip contents into
app/code/Bread/BreadCheckoutfolder - Copy file
app/code/Bread/BreadCheckout/etc/adminhtml/system.ca.xmltoapp/code/Bread/BreadCheckout/etc/adminhtml/system.xml - Copy file
app/code/Bread/BreadCheckout/view/adminhtml/web/js/validation.ca.jstoapp/code/Bread/BreadCheckout/view/adminhtml/web/js/validation.js - Enable module
bin/magento module:enable Bread_BreadCheckout
bin/magento setup:upgrade
bin/magento setup:di:compile
bin/magento setup:static-content:deploy
Basic Configurations
Find the PayPlan Extension’s settings in the Magento 2 admin by:
- Click on Stores on the left hand menu, select Configuration under Settings
- Under Configuration, click on the Sales menu and select Payment Methods
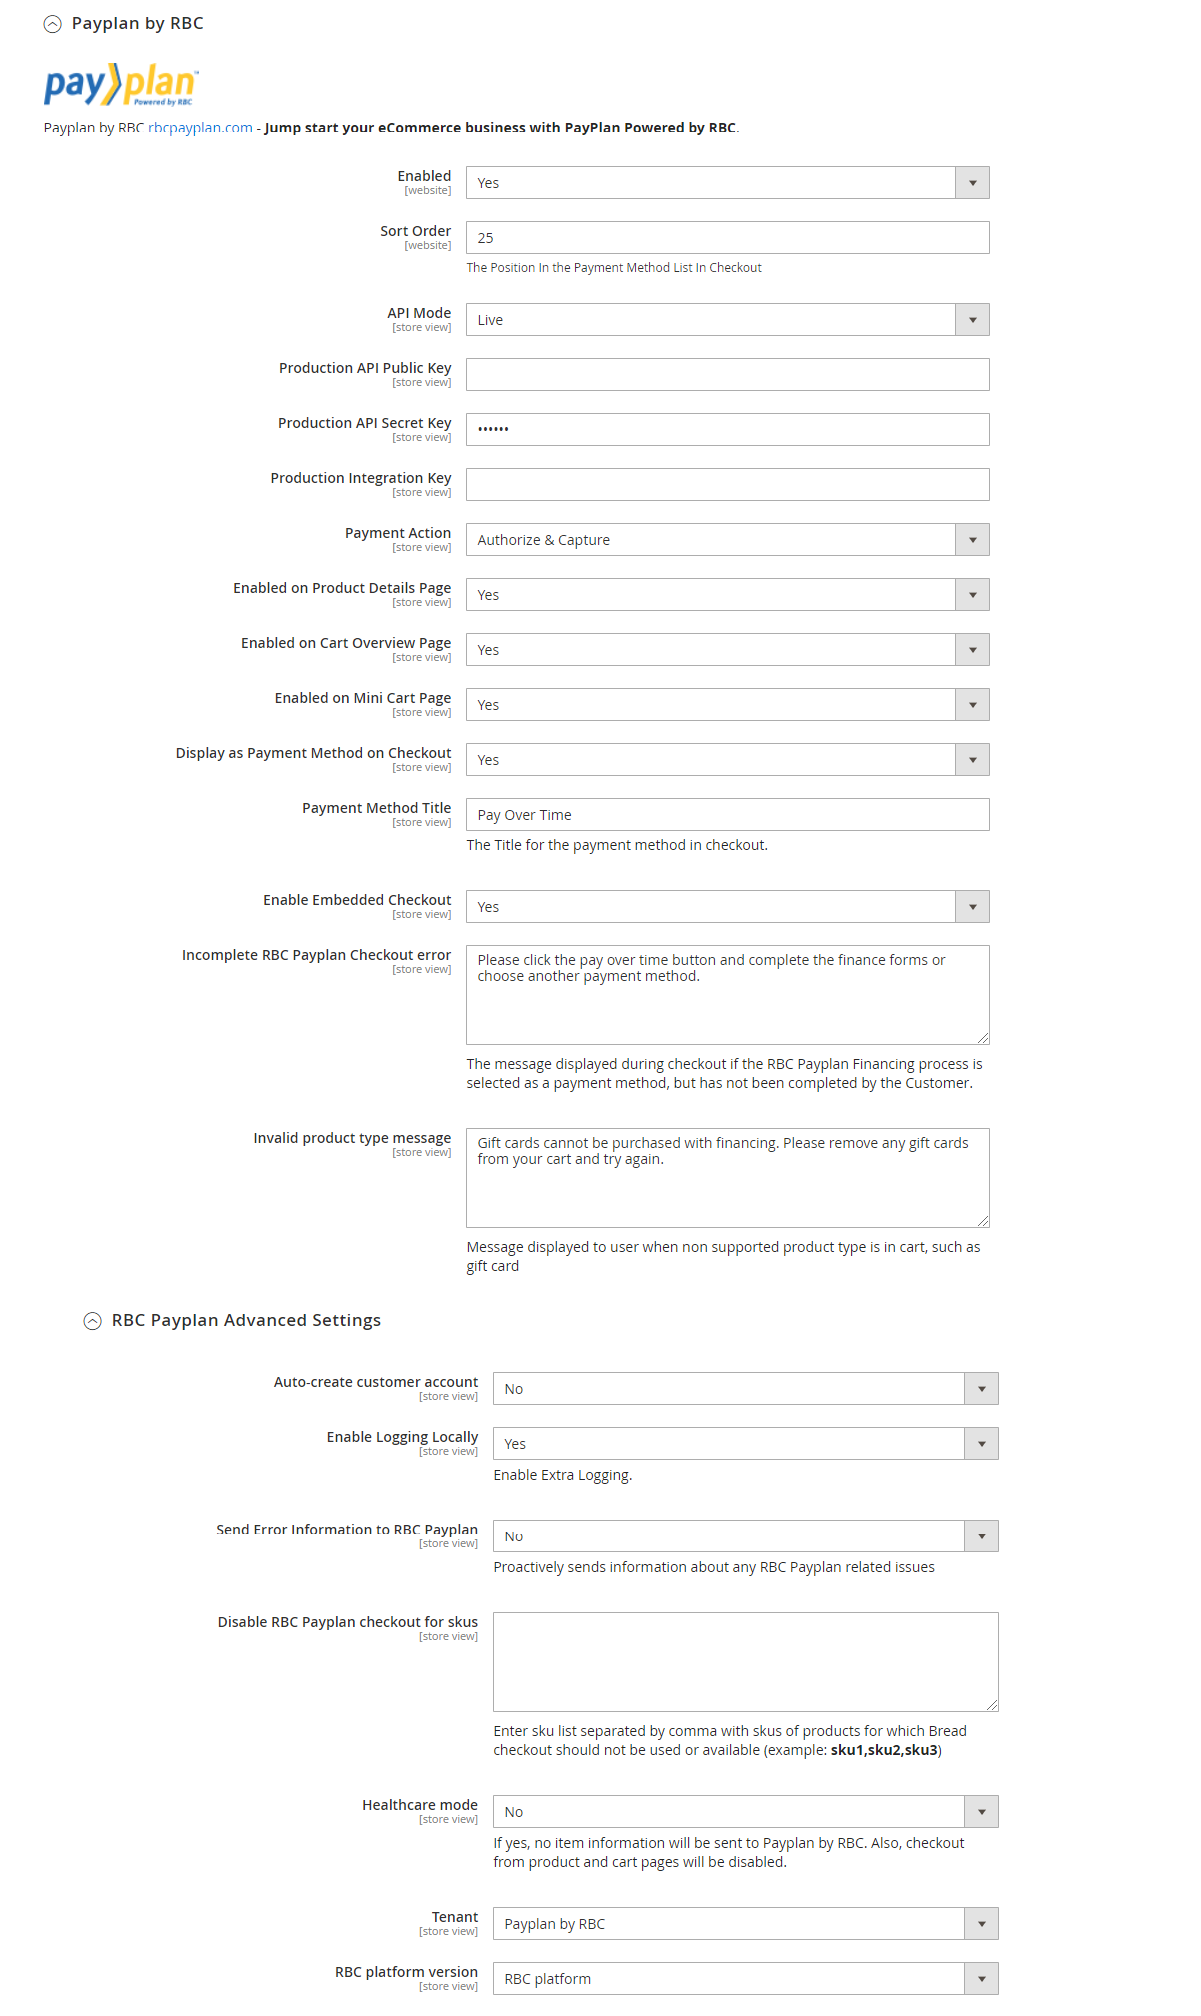
- Under Payment Methods, open Other Payment Methods and Payplan by RBC
Basic Settings:
- Set Enabled to Yes
- API Mode should be set to Sandbox during integration testing, but should be switched over to Live once your integration is ready for production
- Find your sandbox API and secret keys in your Merchant Portal
- Enter your Integration Key into the Integration Key field
- Enter your API Key into the Sandbox API Public Key field
- Enter your Secret Key into the Sandbox API Secret Key field. You can access these keys within the Account Settings section of your PayPlan Merchant portal.
- Set Payment Action to Authorize & Capture to request for the immediate capture of funds upon checkout. Please speak with your Success account manager before enabling Authorize & Capture
- Enable button on product details, cart, and/or checkout pages by changing one or more of Enabled on Product Details Page, Enabled on Cart Overview Page, and Display as Payment Method on Checkout to Yes.
- In the upper right corner, hit Save Config to save your settings
- Flush your Magento cache and reload your store on a page you’ve enabled Bread to confirm everything appears
With the basic settings above, you’ll be able to render PayPlan in the specified parts of your site.

STEP 2: Style the PayPlan Button
The PayPlan button can be styled to match your site’s theme.
Button Styling
The PayPlan button will render on PDP and Cart pages in an anchor tag, and it can be styled with CSS via your site's stylesheet. In order to style the Bread button, add the below snippets to your stylesheet:
On PDP:
#rbc-payplan-btn a {
  /*Add your styles here*/
}
On Cart:
#rbc-checkout-btn a {
  /*Add your styles here*/
}
Positioning and Sizing
Positioning of the PayPlan button is controlled by the placement of the PayPlan page block in Magento. You will need to edit your Magento files directly to make position adjustments for the Bread button.
You can control the size of your PayPlan button with CSS, but you will first need to set Use default button size to No in the PayPlan Extension Settings of your Admin Dashboard.
Product Detail Page
The identifier of the PayPlan block on the product detail page is breadcheckout.prod.view. By default, it is placed in reference to the product.info.extrahint block. You may use your page templates to place it elsewhere on the page to match your design.
Cart Overview Page
The identifier of the PayPlan block on the cart overview page is breadcheckout.checkout.view. By default, it is placed in reference to the checkout.cart.methods block. You may use your page templates to place it elsewhere on the page to match your design.
Both breadcheckout.prod.view and breadcheckout.checkout.view blocks will place two
bread-btn-cntnr and bread-checkout-btn.
<div id="bread-btn-cntnr">
    <div id="bread-checkout-btn" title="Bread Checkout" class="button"></div>
</div>
STEP 3: Test the PayPlan Extension
We strongly recommend you test your PayPlan integration with your sandbox keys before pushing PayPlan live on your production site. You can leverage the following dummy data when testing PayPlan in sandbox mode.
- Any name and email
- Any Canadian address
- Mobile Number: A random sequence of 10 digits
- Birth Date: A birth date before 2000
- Mobile Code / Token: 1234
- Any Employment type
Note: You will not receive emails nor text messages when testing in Preview mode.
STEP 4: Going Live With PayPlan
Once you have completed testing the PayPlan integration, you can follow the next steps to turn PayPlan on for your customers:
- Access Live Merchant Portal: Ask your main Success point of contact for access to your live Merchant Portal
- Set PayPlan to Live: From within the PayPlan extension settings in your Magento admin portal, change API MODE to LIVE.
- Enter Production Keys: Log into your live merchant portal and find your Integration Key, and API and Secret Keys under Account Settings. Enter your API Key into API Public Key, your Secret Key into API Secret Key, and Integration Key into Integration Key.
- Hit Save Config.
You’re now live with PayPlan!
Updated about 3 years ago
